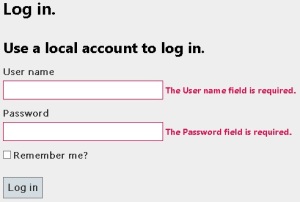
Traditionally in ASP.NET you add a single Validation Summary above your form that describes the errors that the user has made, or add validation messages next to each control in the form to grab the user’s attention to each particular field. The example below from the default MVC 4 application illustrates this.
The problem comes when trying to format a form with a large number of fields in a way that is pleasing to the user and also does not use much space on the screen. jQuery UI tooltips are an alternative option. The user would see a general message that some errors have occurred on the form or a style change to indicate the fields that are problematic. This could be a red border around the field, or even an asterisk. When the user clicks that field to change the data, they are presented with the full error message in a tooltip. It works well in limited space and it’s flashy!
What You Will Need
This particular walk through uses a strongly-typed Razor view in an ASP.NET MVC 4 project. Specfically, the Login view from the default “Internet Application” project generated by Visual Studio. MVC 3 will work fine as well. If your project does not include jQuery UI, you will need that as well. The default project does have jQuery UI already included, but not the tooltip libraries, so I just included the newest version from jQuery’s CDN.
Setting Up the Validator
Most commonly, forms in ASP.NET MVC use the Html.ValidationMessageFor method to generate a validation message based on the model field that is passed in. This causes a problem with jQuery UI tooltips because the ValidationMessageFor method generates span elements and other HTML around the message for formatting purposes. What we need to use here is the ValidateFor method, which will attach all of our validation data to the input field. We can still set all of our information in the model as we usually do, but with out all of the extra HTML. Here are my modifications to the User Name and Password fields to use the ValidateFor method.
<li>
     @Html.LabelFor(m => m.UserName)
     @Html.TextBoxFor(m => m.UserName)
     @{ Html.ValidateFor(m => m.UserName); }
</li>
<li>
     @Html.LabelFor(m => m.Password)
     @Html.PasswordFor(m => m.Password)
     @{ Html.ValidateFor(m => m.Password); }
</li>
One thing should jump out at you right away, and that is the usage of the ValidateFor method on lines 4 and 9. ValidateFor is a void method that has no return value, so we need to call it inside of a code block instead of directly like we call Html.TextBoxFor. A semicolon is necessary as well to terminate the statement.
Adding on a jQuery UI Tooltip
Attaching the jQuery UI tooltip to the control is a piece of cake. All you need to do is add this snippet of JavaScript to your log in page:
<script type="text/javascript">
    $(function () {
        $(document).tooltip({
            items: ".input-validation-error",
            content: function () {
                return $(this).attr('data-val-required');
            }
        });
    });
</script>
We attach the tooltip only to fields that have the “input-validation-error” class. This allows us to only show the error if there is something wrong with the data that the user has entered. If the data for a field is OK, the user will never see the tooltip. Our custom content function grabs the “data-val-required” attribute from the input tag to display as the tooltip mesage, which contains the validation message that you set in your model.
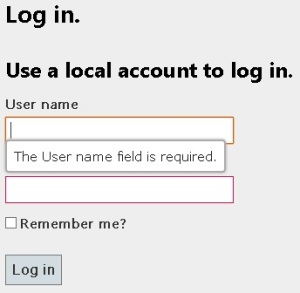
Here’s our new and improved (and much more compact) log in form! You can see that we have the red borders to tell us which fields need updating, but the tooltips will hide unless the user focuses on the field. In this case, the password validation message will show when the user switches to that input, and the User Name validation will hide.
The possibilities for styling and positioning the tooltip with jQuery UI are endless. For example, you could add a bright red alert box and you could position it anywhere in reference to the field; above, below, or to the side.
It’s really that easy. Please feel free to leave a comment if you have any questions.


Thanks for your wonderful and precise article
Thanks for commenting. I appreciate it!
Nice and easy ! 😉
Thanks for reading!
Just what I needed